Transform Your Classroom: Learn How To Make A Tree In A Classroom And Inspire Growth!

How to Make a Tree in a Classroom
Introduction
Dear Smart People,
2 Picture Gallery: Transform Your Classroom: Learn How To Make A Tree In A Classroom And Inspire Growth!
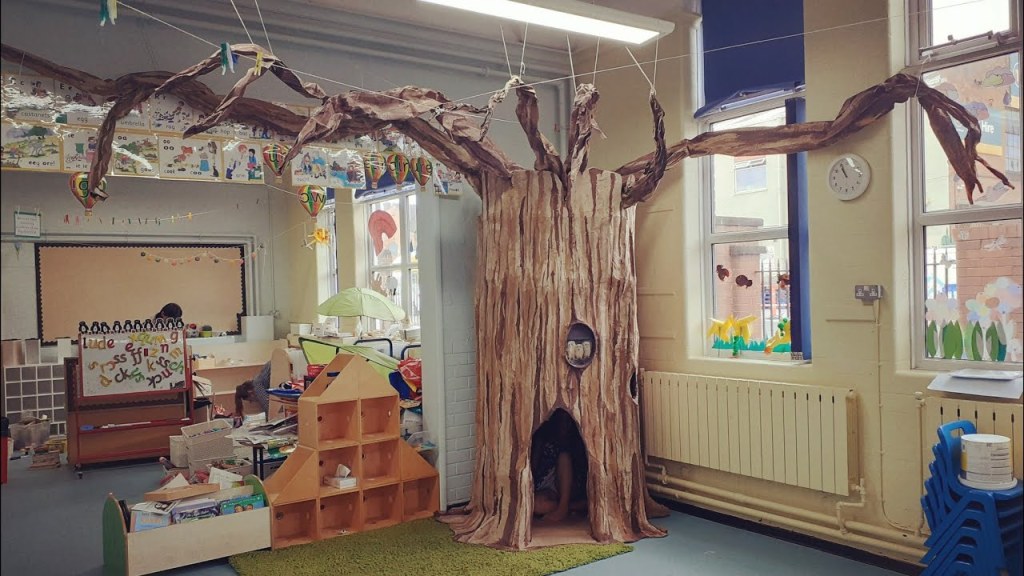
Welcome to our article on how to make a tree in a classroom. In today’s fast-paced and technology-driven world, it is important for educators to find creative and interactive ways to engage students. One such way is by bringing nature into the classroom. Creating a tree in a classroom not only provides a visual representation of nature but also offers various learning opportunities for students.
Image Source: ytimg.com
In this article, we will guide you through the process of making a tree in your classroom. We will cover the materials required, step-by-step instructions, and the benefits it brings to the learning environment. Let’s get started!
What is a Classroom Tree?
🌳 A classroom tree is a three-dimensional representation of a tree that is created within the confines of a classroom. It is often made using recyclable materials and serves as a visual aid for teaching various subjects such as biology, environmental science, and art.
Image Source: ytimg.com
Creating a classroom tree allows students to explore the different parts of a tree, learn about their functions, and understand the importance of trees for our environment. It also encourages creativity and teamwork among students.
Who Can Make a Classroom Tree?
👨🏫 Teachers, educators, and homeschooling parents can make a classroom tree for their students. It is suitable for all grade levels, from kindergarten to high school. The activity can be customized according to the age and abilities of the students.
Additionally, individuals who are passionate about education and want to create a stimulating learning environment at home can also make a classroom tree for their children.
When is the Best Time to Make a Classroom Tree?
🗓️ A classroom tree can be made at any time during the school year. It can be a great project to start at the beginning of the academic year or as part of a specific unit of study. However, it is important to plan ahead and allocate sufficient time for the completion of the project.
Before starting the project, consider the availability of resources, the curriculum schedule, and the students’ engagement levels. Making a classroom tree can be a long-term project that requires ongoing maintenance and care.
Where Should You Place the Classroom Tree?
🏫 The placement of the classroom tree depends on the available space in the classroom. Ideally, it should be positioned in a prominent area that is easily visible to all students. This could be near the front of the classroom or in a designated learning corner.
Consider the size of the tree and ensure that it does not obstruct movement or disrupt other classroom activities. If space is limited, you can create a smaller version of the tree or opt for a wall-mounted tree.
Why Should You Make a Tree in a Classroom?
🌱 Making a tree in a classroom offers numerous benefits for both students and educators:
1. Enhanced Learning: A classroom tree provides a hands-on learning experience, allowing students to explore different scientific concepts related to trees, such as photosynthesis, ecosystems, and plant life cycles.
2. Environmental Awareness: Creating a classroom tree can spark discussions about the importance of trees in our environment, including their role in reducing pollution, providing habitat for wildlife, and regulating climate.
3. Creativity and Teamwork: The process of making a classroom tree encourages students to think creatively, collaborate with their peers, and develop problem-solving skills.
4. Sense of Ownership: Students take pride in their creation and feel a sense of ownership over the classroom tree. It can foster a positive and engaging learning environment.
5. Visual Representation: A classroom tree serves as a visual aid that reinforces learning and helps students remember key concepts. It adds an element of beauty and nature to the classroom.
How to Make a Tree in a Classroom
Materials Needed:
Cardboard
Newspaper
Paint
Paintbrushes
Scissors
Tape
Markers
Glue
Decorative materials (optional)
Step-by-Step Instructions:
1. Prepare the cardboard by cutting out a large tree shape. This will serve as the base of your classroom tree.
2. Crumple newspaper into balls and tape them onto the cardboard tree shape to create the tree trunk and branches.
3. Mix paint colors to achieve the desired shade for the tree trunk and branches. Paint the entire cardboard tree shape, including the newspaper balls.
4. Allow the paint to dry completely. This may take a few hours or overnight, depending on the paint used.
5. Use markers to add details such as bark texture, leaves, and any other features you want to include.
6. Cut out leaf shapes from colored paper or use decorative materials such as tissue paper or fabric to create leaves. Attach them to the branches using glue or tape.
7. Decorate the base of the tree with additional materials such as rocks, fake grass, or small figurines to create a more realistic look (optional).
8. Once the tree is complete, find a suitable spot in the classroom and secure it in place using tape or other adhesive materials.
Advantages and Disadvantages of Making a Tree in a Classroom
Advantages:
1. Hands-on Learning Experience: Creating a tree in a classroom provides students with a hands-on learning experience that enhances their understanding of various scientific concepts.
2. Environmental Awareness: The process of making a classroom tree fosters discussions about the importance of trees and promotes environmental awareness among students.
3. Creativity and Collaboration: Making a classroom tree encourages creativity and collaboration, as students work together to design and construct the tree.
4. Visual Aid for Learning: The presence of a classroom tree serves as a visual aid that reinforces learning and helps students remember key concepts.
5. Sense of Ownership: Students develop a sense of ownership over the classroom tree, which creates a positive and engaging learning environment.
Disadvantages:
1. Time and Effort: Creating a classroom tree can be time-consuming and requires ongoing maintenance to ensure its longevity.
2. Space Constraints: Classroom trees can take up valuable space in the classroom, which may limit movement and other classroom activities.
3. Resource Availability: Acquiring the necessary materials for making a classroom tree may be challenging for some educators, especially those with limited budgets.
4. Potential Mess: Working with paint, glue, and other materials can result in a messy classroom environment, requiring additional cleanup.
5. Seasonal Limitations: Depending on the materials used, a classroom tree may not withstand seasonal changes and may need to be replaced or modified accordingly.
Frequently Asked Questions (FAQs)
1. Can a classroom tree be made with recycled materials?
Yes, a classroom tree can be made using recycled materials such as cardboard, newspaper, and other items found around the classroom or at home.
2. Is it necessary to have a background in art to make a classroom tree?
No, anyone can make a classroom tree regardless of their artistic abilities. It is a fun and interactive project that encourages creativity and teamwork.
3. How long does it take to make a classroom tree?
The time required to make a classroom tree depends on the complexity of the design and the availability of resources. It can range from a few hours to several days.
4. Can a classroom tree be made in a homeschooling environment?
Absolutely! Making a classroom tree can be a great activity for homeschooling parents to engage their children in hands-on learning experiences.
5. Can a classroom tree be used for subjects other than science?
Yes, a classroom tree can be incorporated into various subjects such as art, geography, and even language arts. It provides a versatile learning tool.
Conclusion
In conclusion, creating a tree in a classroom is an innovative way to engage students and enhance their learning experience. The process of making a classroom tree promotes environmental awareness, creativity, and collaboration among students. It serves as a visually appealing and educational tool that reinforces key concepts related to trees and their importance in our environment.
We hope this article has provided you with valuable insights and practical guidance on how to make a tree in your classroom. So, go ahead and bring nature into your learning space, and watch your students thrive!
Final Remarks
Disclaimer: The information contained in this article is for educational purposes only. The author and publisher do not assume any responsibility for the implementation of the ideas or techniques discussed.
Remember to always prioritize safety when working with materials and supervise students accordingly. Adapt the instructions and materials to suit the age and abilities of your students.
Happy tree making, Edu Enthusiasts!
This post topic: Classroom
")


